chocolate peanut butter rice krispie cups are my go to fix for those moments when you want something sweet right now, but you do not want to bake, wash a million dishes, or wait an hour for a dessert to cool. I started making these on busy weeks when I still wanted a fun treat in the fridge. They are crunchy, creamy, and chocolatey in the most satisfying way. Plus, they feel a little nostalgic, like a candy shop snack you somehow made at home. If you have a muffin tin and about 20 minutes of hands on time, you are in business. 
What ingredients are in these peanut butter chocolate crunch cups?
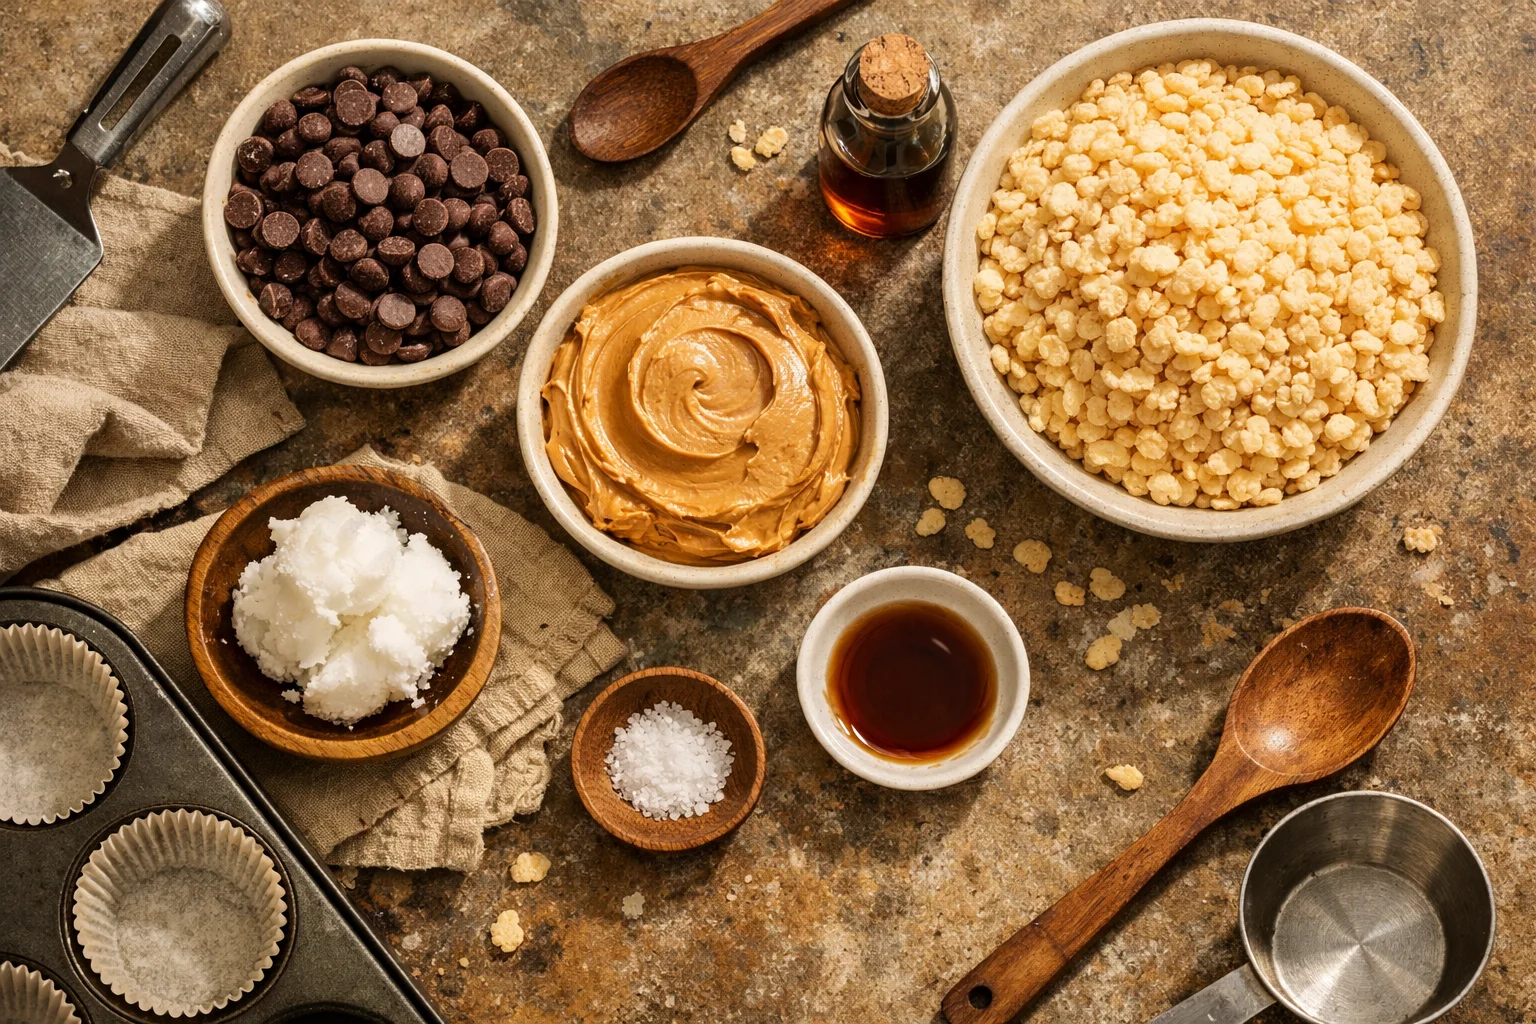
The beauty of this recipe is that it is built from simple pantry stuff. It is basically a few good ingredients doing the heavy lifting, so try to use ones you actually like the taste of. When the ingredient list is short, the flavor really shows up.
Here is what I use most of the time for chocolate peanut butter rice krispie cups:
- Chocolate chips: semi sweet is my default, but dark works if you like a less sweet bite
- Peanut butter: creamy is easiest to mix, and a standard shelf stable kind sets up the best
- Rice Krispies cereal: for that classic crunchy snap
- Coconut oil or butter: optional, but a tiny bit helps the chocolate melt smoother
- Pinch of salt: especially helpful if your peanut butter is on the sweeter side
- Vanilla: optional, but it adds that warm dessert flavor
A few quick notes from my own trial and error:
If you use natural peanut butter that is super runny, your cups may not set as firmly. They will still taste great, but they can be a bit softer. Also, if your cereal is a little stale, you will notice it, so use a fresh box if you can.
And if you are wondering about the balance, I like a thicker peanut butter layer than chocolate layer. It gives you that creamy center that feels like a peanut butter cup, but with crunch.
How to make chocolate peanut butter crunch cups?
This is the part where you realize why I make these so often. No oven. No mixer. No complicated steps. Just melt, mix, scoop, chill, and try not to eat them all before they fully set.
What you will need: a muffin tin, paper liners, two microwave safe bowls (or a small saucepan), and a spoon.
Step by step directions
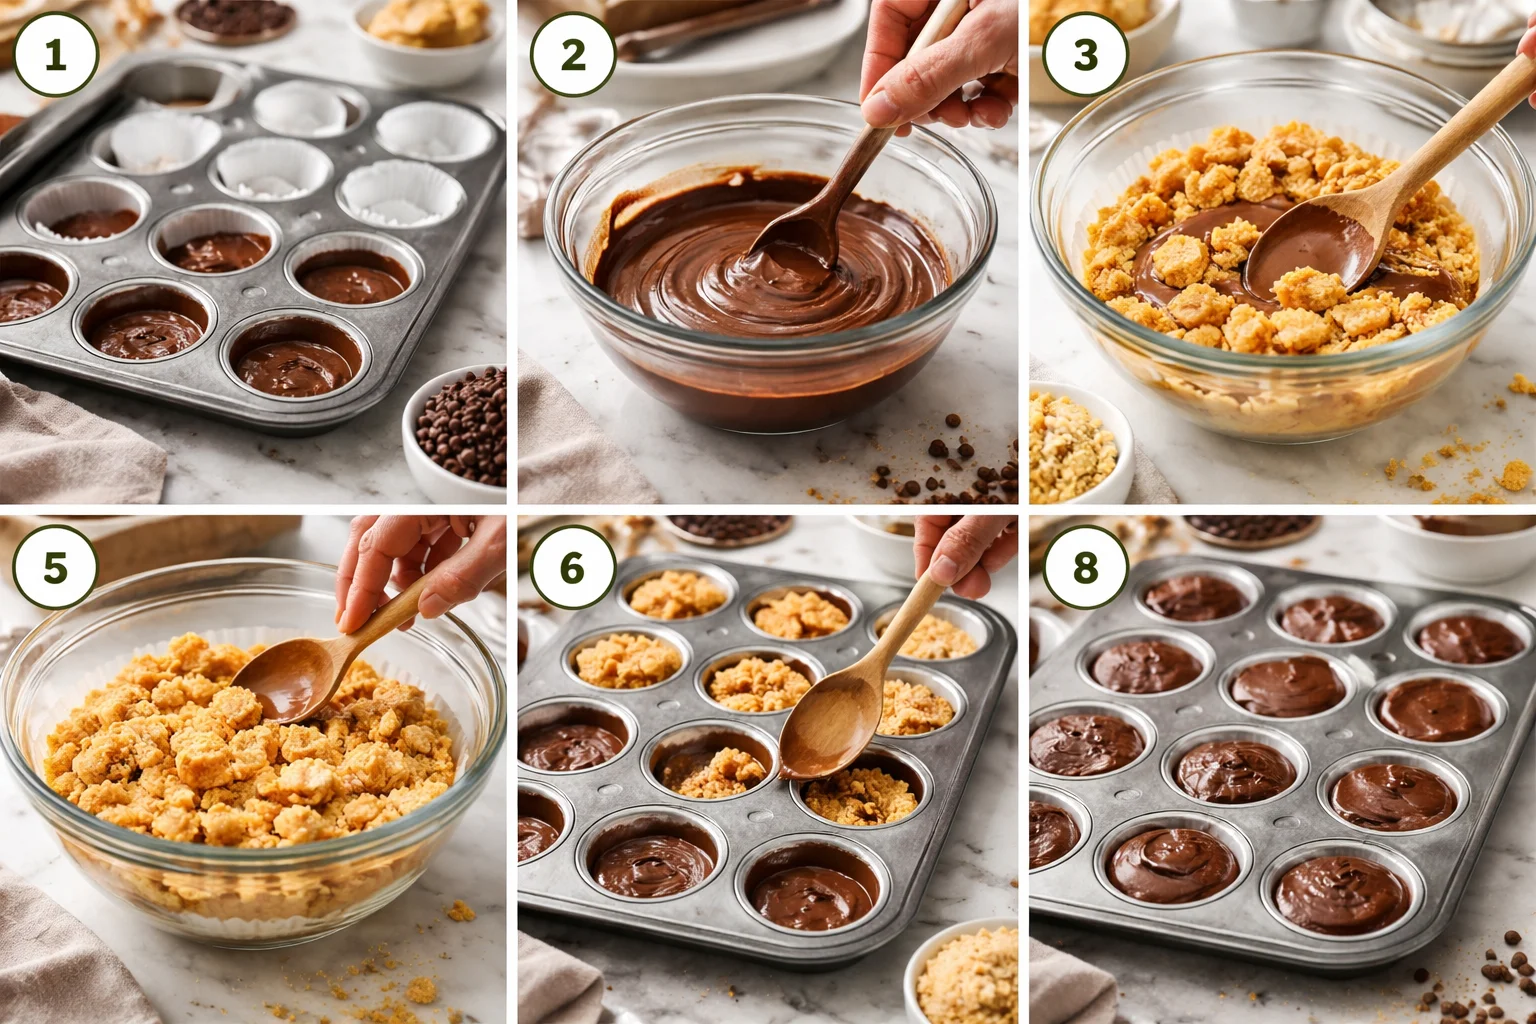
1) Line your muffin tin with paper liners. This makes the cups easy to pop out and keeps your tin clean.
2) Melt your chocolate. I microwave in 20 to 30 second bursts, stirring each time, until smooth. If it looks thick, stir in a little coconut oil or butter.
3) Spoon a small amount of melted chocolate into each liner. Just enough to coat the bottom. Tilt the liner a bit so it spreads. Then put the tray in the freezer for about 5 minutes so it firms up.
4) Mix the filling. In a bowl, stir peanut butter with rice krispies until the cereal is evenly coated. Add a pinch of salt. If you want a sweeter filling, you can mix in a spoonful of honey or powdered sugar, but I usually skip it.
5) Add the crunchy peanut butter layer. Scoop the mixture on top of the set chocolate bases. Press gently so it is even, but do not smash the crunch out of it.
6) Top with more chocolate. Spoon the remaining melted chocolate over each cup. Tap the muffin tin lightly on the counter so the chocolate settles into an even layer.
7) Chill until set. Fridge takes about 30 to 45 minutes. Freezer takes about 15 to 20. Then they are ready.
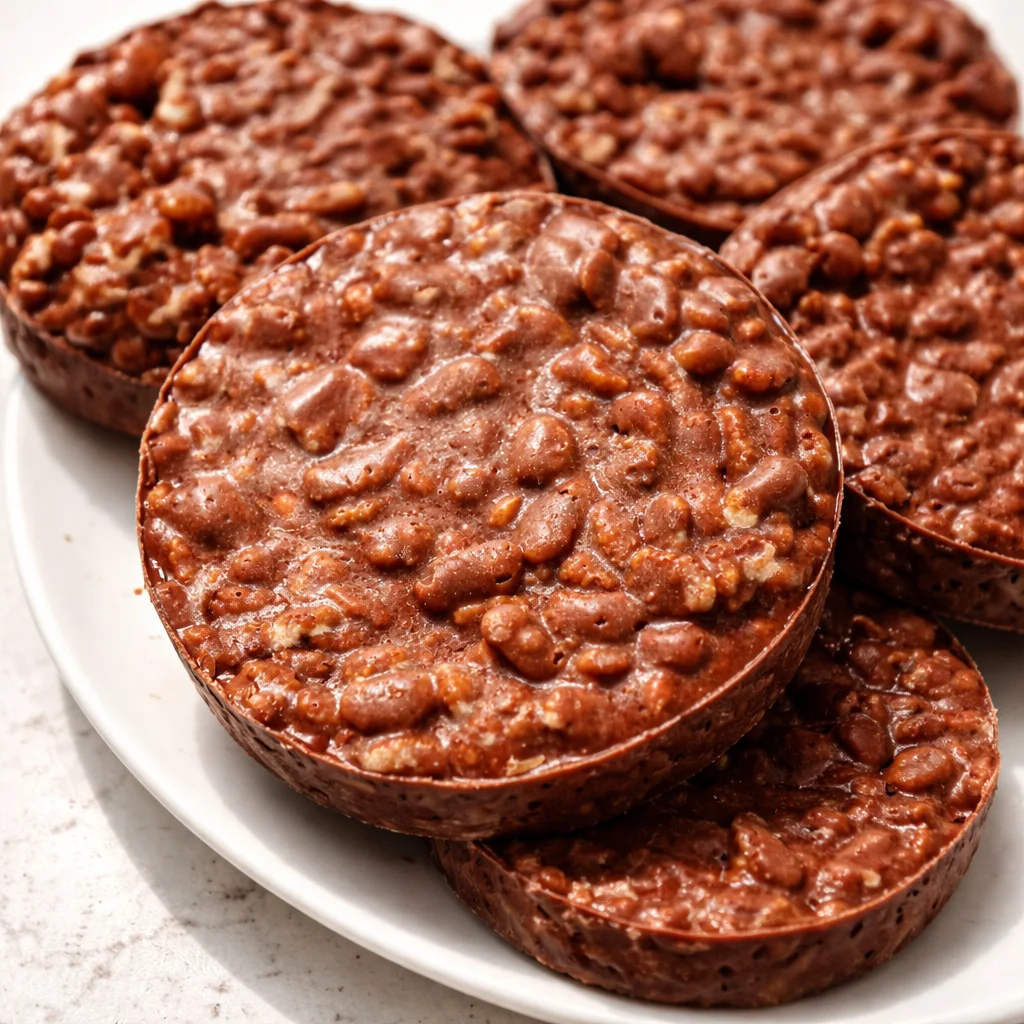
This is the moment I always get tempted to “taste test” one early. If you cut into them too soon, the top can crack a bit. If you can wait the full chill time, they slice cleaner and look prettier. But honestly, even the messy ones get eaten fast in my house.
“I made these for a movie night and my kids thought they were store bought. Crunchy, chocolatey, and gone in ten minutes.”
Once you have the method down, chocolate peanut butter rice krispie cups become one of those recipes you can make without measuring everything perfectly. You will get a feel for the texture you like, extra crunchy or extra creamy.
Tips for Success
I have made these enough times to learn what helps and what can mess them up. None of this is hard, but these small tips will make your cups look nicer and taste even better.
Use liners. If you skip them, you will be chiseling chocolate out of your muffin tin, and that is not the vibe.
Do not overheat the chocolate. Burnt chocolate turns grainy and tastes off. Short bursts in the microwave, lots of stirring, and you are safe.
Press gently. When you add the peanut butter cereal layer, press just enough to level it. If you pack it down hard, the cups get dense instead of light and crunchy.
Salt is your friend. A tiny pinch makes the chocolate taste more chocolatey and keeps the sweetness from feeling flat.
Let them set fully. I know, it is hard. But the texture is so much better when the layers have time to firm up.
One more thing I do when I want them to look extra cute is sprinkle a few rice krispies or a tiny pinch of flaky salt on top before the chocolate sets. It is a small detail, but it makes them look like a real treat instead of a rushed fridge snack.
Recipe Adaptations
This recipe is super flexible, which is probably why I never get bored of it. You can keep the basic idea and swap things based on what you have or what you need for allergies and preferences.
Easy swaps that actually work
Make it dairy free: use dairy free chocolate chips and coconut oil instead of butter.
Try a different nut butter: almond butter is mellow and delicious. Sunflower seed butter works for nut free homes, but it has a stronger flavor, so I like it with dark chocolate.
Add a little texture: stir in mini chocolate chips, chopped peanuts, or shredded coconut to the peanut butter cereal mix.
Make them extra dessert like: add a thin layer of caramel sauce between the peanut butter crunch and the top chocolate layer, but do not overdo it or they can slide apart.
Boost the crunch: mix in a handful of crushed pretzels with the cereal for a sweet salty bite.
If you are making chocolate peanut butter rice krispie cups for a party, I like doing a variety tray. Some topped with flaky salt, some with sprinkles, some with chopped peanuts. It looks fun and people can pick their favorite.
More No-Bake Desserts
If you love desserts that do not require turning on the oven, you are my kind of person. I am a big fan of anything that can be made in one bowl, chilled, and enjoyed straight from the fridge.
Here are a few ideas that match the same low effort, high reward vibe:
Chocolate covered dates stuffed with peanut butter or almonds
Oat and peanut butter balls with cocoa powder and a little honey
No bake cheesecake jars made with crushed cookies and a quick cream cheese filling
Frozen yogurt bark with fruit and a drizzle of melted chocolate
But honestly, when I want something that feels like candy and still has that homemade comfort, I circle right back to chocolate peanut butter rice krispie cups. They are the kind of treat you can keep in the fridge and grab whenever you need a sweet bite without making a whole production out of dessert.
Common Questions
Can I store these at room temperature?
You can for a short time, like on a dessert table, but I recommend storing them in the fridge. They hold their shape better and stay snappy.
How long do they last?
In an airtight container in the fridge, they are great for about 5 to 7 days. In the freezer, they can last a couple months. I like freezing them because they taste amazing slightly frozen.
Why is my chocolate layer cracking?
Usually it is because the chocolate is cold and hard and you are biting into it straight from the fridge. Let the cups sit on the counter for 5 minutes before eating, or add a tiny bit of coconut oil when melting the chocolate to keep it a little softer.
Can I use crunchy peanut butter?
Yes. It makes the filling even more textured. Just know it can be harder to mix with the cereal, so stir patiently.
What if I do not have a muffin tin?
You can spread the layers in a lined square pan, chill, and slice into bars. It is less “cup” shaped, but it tastes exactly the same.
A sweet little wrap up before you go
If you want a no bake dessert that tastes like a candy bar and takes minimal effort, chocolate peanut butter rice krispie cups are it. They are crunchy, creamy, and easy to customize with whatever you have around. Keep a batch in your fridge for snack attacks, lunchbox treats, or last minute guests. And if you want to compare other tasty versions, check out Chocolate Peanut Butter Crunch Cups – rachLmansfield and Chocolate Peanut Butter Rice Krispie Cups – The Cookin Chicks for more inspiration. Now go grab that muffin tin and make a batch, you will be so glad you did. 
Chocolate Peanut Butter Rice Krispie Cups
Ingredients
Method
- Line your muffin tin with paper liners.
- Melt the chocolate in a microwave-safe bowl in 20-30 second bursts, stirring each time until smooth. Stir in coconut oil or butter if it looks thick.
- Spoon a small amount of melted chocolate into each liner, just enough to coat the bottom. Tilt the liner to help spread the chocolate, then freeze for about 5 minutes.
- In a separate bowl, mix the peanut butter with Rice Krispies until the cereal is evenly coated. Add a pinch of salt.
- Scoop the peanut butter mixture on top of the set chocolate bases and press gently to ensure evenness.
- Top with remaining melted chocolate, tapping lightly on the counter to settle the layer.
- Chill until set—about 30-45 minutes in the fridge or 15-20 minutes in the freezer.