

Quick & Tangy Refrigerator Pickled Vegetables: A Flavorful Adventure Awaits!
When my grandmother used to make pickled vegetables, the entire house would come alive with the tangy, savory aromas that wrapped around you like a warm hug. Her Easy Refrigerator Pickled Vegetables Recipe – Quick & Tangy! was more than just a method; it was an expression of love and culinary tradition. Every time I crack open a jar of these vibrant veggies, a wave of nostalgia sweeps over me. I remember summer picnics, family barbecues, and laughter around the table while we enjoyed her colorful creations, which she insisted included the freshest ingredients and a dash of joy.
What sets this recipe apart from others? Not only is it incredibly straightforward—perfect for those just starting in the kitchen—but it also allows you to adapt to whatever vegetables you have on hand, making it the ultimate flexible dish! You’ll learn how to create irresistibly crunchy, tangy, and flavorful pickles that can elevate any meal and offer a burst of freshness in every bite. Trust me, once you make these, they’ll join the ranks of your go-to recipes, accompanying everything from grilled meats to sandwiches with panache!
So, grab your favorite cutting board and let’s dive into a world of flavor as we explore the wonders of refrigerator pickling! You’re in for a treat.
What Are Easy Refrigerator Pickled Vegetables?
Easy Refrigerator Pickled Vegetables are a delightful way to preserve fresh veggies without the need for long canning processes. Originating from a long-standing tradition of preservation, this quick pickling method allows you to enjoy seasonal produce year-round.
The combination of crisp cauliflower, crunchy carrots, and zesty cucumbers gives this recipe an exciting medley of flavors and textures—exactly what every meal deserves! This particular pickling method ensures that the vegetables maintain their vibrant colors and delightful crunch while absorbing the tangy, sweet brine.
Make these pickled treats when you have an abundance of veggies, or just as a quick side to impress your guests! They are perfect for barbecues, salads, snacking, or even as a garnish for your favorite dishes. Now, doesn’t that sound amazing?
Why You’ll Love This Recipe
Convenience: The Easy Refrigerator Pickled Vegetables Recipe – Quick & Tangy! requires no fancy equipment or long hours of canning. Just chop, mix, and refrigerate—it’s that simple!
Freshness: Store-bought pickles often lack the vibrant flavor and crunch of fresh veggies. By making your own, you retain the freshness and control the ingredients, avoiding unnecessary preservatives and additives.
Cost-Effective: Creating these pickled veggies at home is a budget-friendly option, especially if you buy produce in bulk or are growing your own garden vegetables.
Customization: Feel free to get creative! This recipe can be adapted to include any of your favorite vegetables, and you can adjust the spices to match your personal taste—whether you prefer sweet, spicy, or zesty picks.
Quick Prep Time: It takes just about 30 minutes to make the brine and prep your veggies. After soaking in the delicious liquid overnight, you’ll have flavor-packed pickles ready to brighten any meal!
With minimal effort and time, you get a jar full of tangy goodness that rivals any restaurant’s offering, and your friends and family will never know it was this easy!

Ingredients
Here’s what you’ll need to create your stunning batch of Easy Refrigerator Pickled Vegetables:
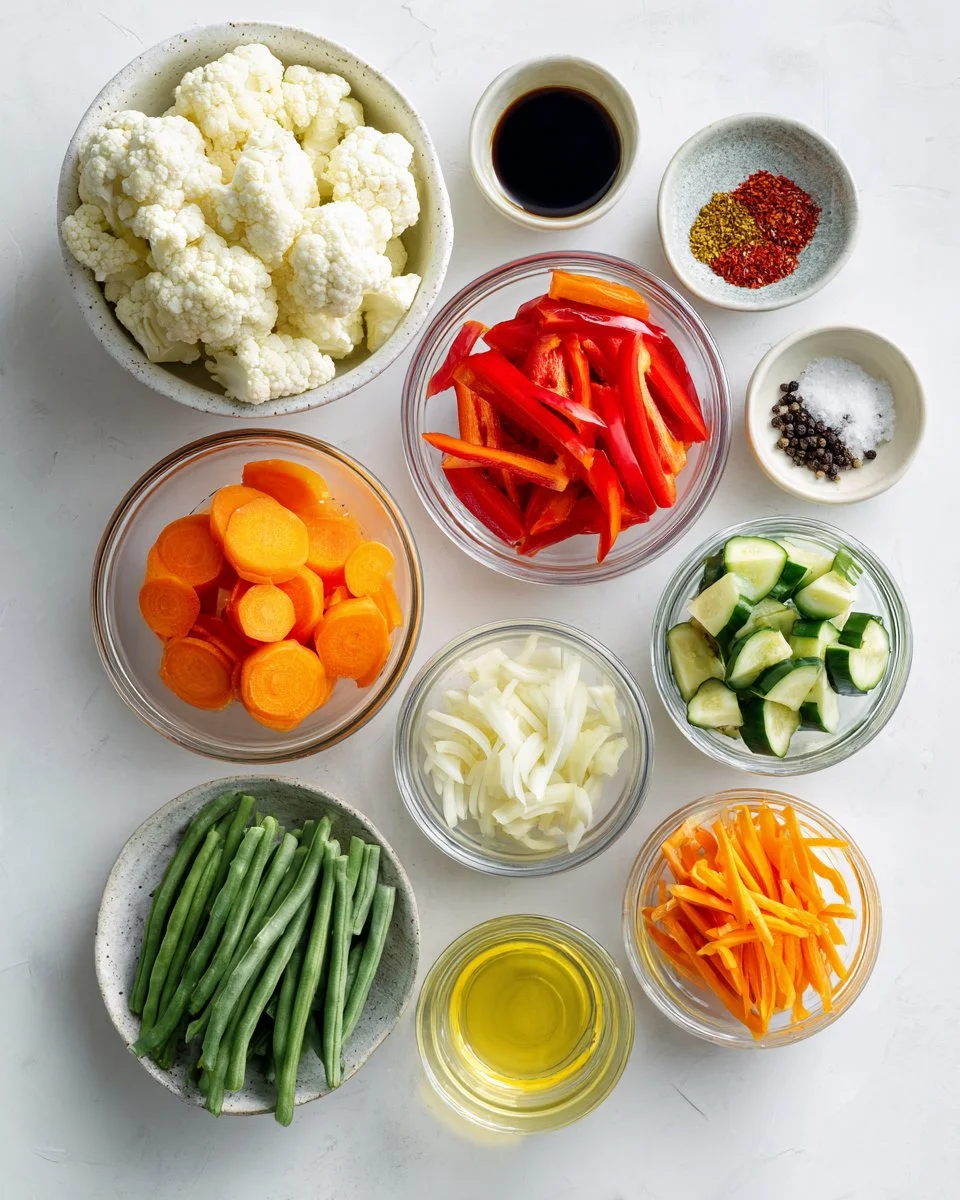
- 2 cups cauliflower florets (fresh is best, but frozen will work in a pinch)
- 1 cup sliced carrots (supermarkets often have pre-sliced for convenience)
- 1 cup sliced cucumbers (pickling cucumbers provide extra crunch!)
- 1 red bell pepper, sliced into strips (adds a sweet touch)
- 1 cup green beans, trimmed (fresh or frozen)
- 3 cloves garlic, minced (for that aromatic punch)
- 2 cups white vinegar (avoid the flavored varieties for purity)
- 2 cups water (filtered is ideal)
- 2 tablespoons salt (I recommend kosher for texture)
- 1 tablespoon sugar (balancing the vinegar’s acidity)
- 2 teaspoons mustard seeds (for that extra zing)
- 1 teaspoon black peppercorns (adds depth)
- 1/2 teaspoon red pepper flakes (optional, for some heat)
Notes:
- Ingredient Quality: Always opt for fresh and organic vegetables when possible; they really make a difference in taste.
- Substitutions: You can swap out any vegetable with another of your choosing. Radishes, zucchini, or even asparagus work beautifully!
- Prep Notes: Ensure your jars and utensils are clean to extend shelf life.
Step-by-Step Instructions
Now, let’s jump into how to create these fabulous fridge pickles!
Prep the Vegetables: In a large bowl, combine 2 cups of cauliflower florets, 1 cup of sliced carrots, 1 cup of sliced cucumbers, 1 sliced red bell pepper, and 1 cup of trimmed green beans. Set aside while we prepare the brine.
Make the Brine: In a saucepan over medium heat, bring 2 cups of white vinegar, 2 cups of water, 2 tablespoons of salt, 1 tablespoon of sugar, 2 teaspoons of mustard seeds, 1 teaspoon of black peppercorns, and the optional ½ teaspoon of red pepper flakes to a boil. Stir occasionally until the salt and sugar are fully dissolved.
- Chef’s Tip: Keep an eye on the mixture; once bubbles start forming, it’s nearly ready!
Combine: Pour the hot brine over the bowl of vegetables, ensuring they are completely submerged. Let them cool to room temperature; this typically takes around 15-20 minutes.
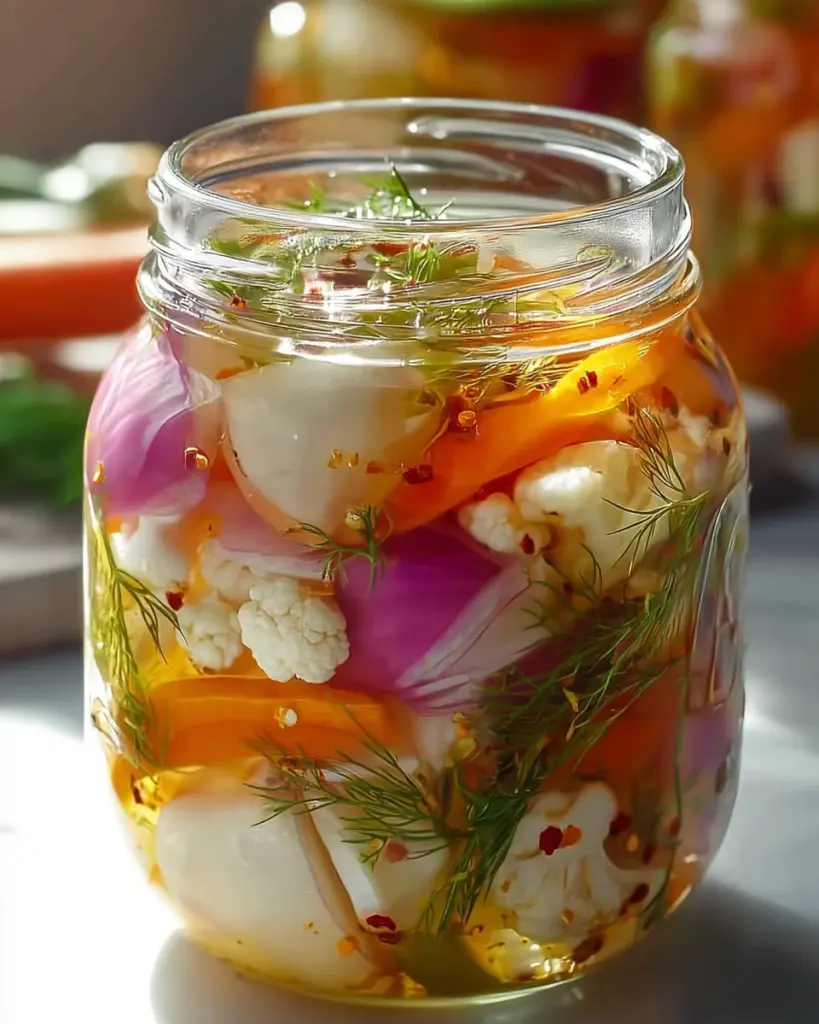
Transfer to Jars: Once cooled, pack the vegetables into sterilized jars, pouring the brine over them. Make sure the veggies remain fully submerged. Seal the jars tightly.
Refrigerate: Store your pickled veggies in the refrigerator for at least 24 hours before diving in. The longer they sit, the more flavorful they become, with their tangy goodness seeping through!
Enjoy: Chill and savor the crunchy delights as a snack, side, or topping!
- Common Mistakes: Make sure your veggies don’t float! If they do, use a weight to keep them submerged.
Expert Tips & Tricks
Storage Recommendations: Store your pickles in the fridge where they’ll keep fresh for up to 2 weeks. If you want a longer lifespan, consider canning methods.
Make-ahead Instructions: These pickles only get better with time! I recommend making them at least 48 hours before any event to allow the flavors to develop fully.
Troubleshooting: If your pickles end up too salty, simply add extra water and vinegar to the mix next time. Taste test frequently, and don’t be afraid to tweak the recipe to your liking!
Serving Suggestions: These delightful pickles make great garnishes for sandwiches or tacos and are an incredible addition to snack platters with cheeses and meats.
Batch Variations: Double the recipe for a big gathering or to stock your fridge, just remember to use new jars to maintain freshness.
Flavor Enhancements: Experiment with adding fresh herbs like dill or even spices like coriander seeds for a new flavor profile.
Serving Suggestions
These vibrant pickled veggies are so versatile! Serve them alongside grilled meats, atop burgers, or as a zesty complement to sandwiches. To elevate your presentation, arrange the pickles in a colorful charcuterie board with cheeses, meats, and fresh bread for a dazzling spread. They are perfect for potlucks, summer picnics, or even casual weeknight dinners!
Variations & Substitutions
Feel free to experiment and make this recipe your own! Try adding radishes for a spicier bite or fennel for a hint of sweetness. If you’re looking for dietary adaptations, substituting regular sugar with a sugar alternative or opting for lower sodium salt is a great way to tweak this recipe. Remember, seasonal vegetables can add unique twists depending on what’s available—from crunchy asparagus in spring to hearty root vegetables in winter.
Nutrition & Storage Info
- Prep Time: 15 minutes
- Cook Time: 15 minutes
- Total Time: 30 minutes
- Yield: Approximately 4 jars
- Estimated Calories: 35 calories per serving
- Storage Instructions: Keep in the fridge; they last up to 2 weeks. For longer storage, consider proper canning techniques.
FAQ Section
How long do refrigerator pickles last?
- They typically last about 2 weeks in the fridge, but the flavor may continue to intensify.
Can I use other vegetables?
- Absolutely! Feel free to substitute your favorites—zucchini, asparagus, or even shallots work well.
Do I need to sterilize the jars?
- Yes, to ensure longevity, always sterilize your jars before filling them, especially if you plan to store them.
What if my pickles are too sour?
- Adjust the sugar next time, or dilute the brine with additional water.
Can I hot pack them?
- Yes, for those interested in long-term storage, consider hot packing techniques.
Are they gluten-free?
- Yes! This recipe is naturally gluten-free.
Can I freeze pickled vegetables?
- While you can freeze some vegetables, the texture may change upon thawing.
What do I do with leftover brine?
- Use it as a dressing for salads or for marinating meats!
Can I make them without sugar?
- Yes, you can omit the sugar or substitute it with a sweetener of your choice.
How spicy are these pickles?
- They’re mildly spicy with the optional red pepper flakes; feel free to adjust or omit based on your preference!

Conclusion
Creating your own Easy Refrigerator Pickled Vegetables Recipe – Quick & Tangy! is not just about flavor; it’s a journey that brings you nostalgia and joy with every crunch. I encourage you to try making these pickles in your kitchen and experience the bursts of tangy goodness that can transform everyday meals. Don’t forget to share your thoughts and feedback, as I love hearing how these recipes become part of your own culinary stories!
And if you enjoyed this recipe, be sure to check out my blog for other delightful creations that bring warmth and flavor to your kitchen. Happy pickling!
Easy Refrigerator Pickled Vegetables
Ingredients
Method
- In a large bowl, combine cauliflower florets, sliced carrots, sliced cucumbers, sliced red bell pepper, and trimmed green beans. Set aside.
- In a saucepan over medium heat, bring white vinegar, water, salt, sugar, mustard seeds, black peppercorns, and optional red pepper flakes to a boil. Stir until salt and sugar are fully dissolved.
- Keep an eye on the mixture; once bubbles start forming, it’s nearly ready.
- Pour the hot brine over the bowl of vegetables, ensuring they are completely submerged. Let it cool at room temperature for 15-20 minutes.
- Once cooled, pack the vegetables into sterilized jars, pouring the brine over them. Ensure the veggies remain fully submerged and seal the jars tightly.
- Refrigerate for at least 24 hours before enjoying. The longer they sit, the more flavorful they become!
- Serve as a snack, side, or topping.